CORS is a relatively new API that came with HTML5 which allows our websites to request external and previously restricted resources. It relaxes the traditional same-origin policy by enabling us to request resources that are on a different domain than our parent page.
For example, before CORS cross-domain, Ajax requests were not possible (making an Ajax call from the page example.com/index.html to anotherExample.com/index.html).
In this article we’ll see how to use CORS to further interact with other systems and websites in order to create even better Web experiences. Before exploring CORS more, let’s first have a look at which browsers support it.
CORS and Browser Support
Internet Explorer 8 and 9 support CORS only through the XDomainRequest class. The main difference is that instead of doing a normal instantiation with something like var xhr = new XMLHttpRequest() you would have to use var xdr = new XDomainRequest();.
IE 11, Edge and all recent and not-really-recent versions of Firefox, Safari, Chrome, Opera fully support CORS. IE10 and Android’s default browser up to 4.3 only lack support for CORS when used for images in <canvas> elements.
According to CanIuse, 92.61% of people globally have supporting browsers which indicates that we are likely not going to make a mistake if we use it.
Making a Simple Cross-Origin Ajax Request
Now that we know that the same-origin policy prohibits websites in different domains from making Ajax requests to other domains, let’s see how we can bypass this in order to make a cross-origin Ajax request to another website.
If you simply try to shoot an Ajax request to a random website, it would most likely not be able to read the response unless that another website allows it.
<script>
    var xhr = new XMLHttpRequest();
    var url = "//example.com";
    xhr.open("GET", url);
    xhr.onreadystatechange = function() {

        if (xhr.status === 200 && xhr.readyState === 4) {

            document.querySelector("body").innerHTML = xhr.responseText
        }
    }
    xhr.send();
</script>
If you open your browser’s console, you would get a message similar to:
XMLHttpRequest cannot load http://example.com. No ‘Access-Control-Allow-Origin’ header is present on the requested resource. Origin ‘http://otherExampleSite.com‘ is therefore not allowed access.
To successfully read the response, you would have to set a header called Access-Control-Allow-Origin. This header has to be set either in your application’s back-end logic (setting the header manually before the response is delivered to the client) or in your server’s configuration (such as editing apache.conf and adding Header set Access-Control-Allow-Origin "*" to it, if you are using Apache).
Adding the header with the meta tag in your document’s <head> tag like this would not work: <meta http-equiv="Access-Control-Allow-Origin" content="*">
Here is how you can enable cross-origin requests for all origins (sites that request the resource) in PHP:
When making cross-origin requests, the destination website has to be the one who has your origin enabled and allows you to read the response from the request.
If you want to allow a specific origin you can do something like this in PHP:
header("Access-Control-Allow-Origin: http://example.com");However, the Access-Control-Allow-Origin header itself does not allow multiple hosts inserted in the header, no matter the delimiter. This means that if you want to allow a cross-origin request from various different domains, you have to dynamically generate your header.
For example, in PHP you can check the origin of the website requesting your resource and if it matches a particular whitelist, add a header that allows that specific origin to make a cross-origin request. Here is a tiny example with a hardcoded whitelist:
Some safety is maintained in the cross-origin request and the credentials (such as cookies) are not leaked during the request-response exchange. Furthermore, if the remote server does not specifically allow the user credentials for its website to be included in a cross-origin request from another website and that website does not explicitly declare it wants the user credentials to be passed to the remote server, then the site making the request will most likely get a response that is not personalized. This happens because the user session cookies would not go to the request and the response will not contain data relevant to a particular logged-in user which reduces CSRF and other exploits.
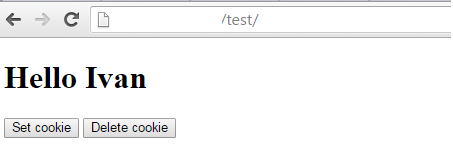
To make things simpler, let’s say that we have two websites. The first one sets a cookie and whenever the user enters, it shows the cookie’s value which is supposed to be his name. The other website makes a cross-origin Ajax request and adds the response to its DOM.


Getting the Page as the User Sees It with CORS
If we want to include the user credentials with the remote request, we have to do two changes, the first in the code of the website making the request and the second in the website receiving the request. In the website making the request we have to set the withCredentials property of the Ajax request to true:
var xhr = new XMLHttpRequest();
 xhr.withCredentials = true;
The remote server itself, besides allowing our origin, has to set an Access-Control-Allow-Credentials header and set its value to true. Using the numbers 1 or 0 would not work.
If we simply set withCredentials to true but the server has not set the above mentioned header, we won’t get the response, even if our origin is allowed. We will get a message similar to:
XMLHttpRequest cannot load http://example.com/index.php. Credentials flag is ‘true’, but the ‘Access-Control-Allow-Credentials’ header is ”. It must be ‘true’ to allow credentials. Origin ‘http://localhost:63342‘ is therefore not allowed access.
If both changes are made, we will get a personalized response. In our case, the user’s name which we stored in a cookie will be in the response that the remote server returns to our website.

However, allowing the credentials to be passed to a cross-origin request is quite dangerous, since it opens up the possibility for various attacks such as CSRF (Cross-Site Request Forgery), XSS (Cross-Site Scripting) and an attacker could take advantage of the user’s logged in status to take actions in the remote server without the user knowing (such as withdrawing money if the remote server is banking website).
Preflights
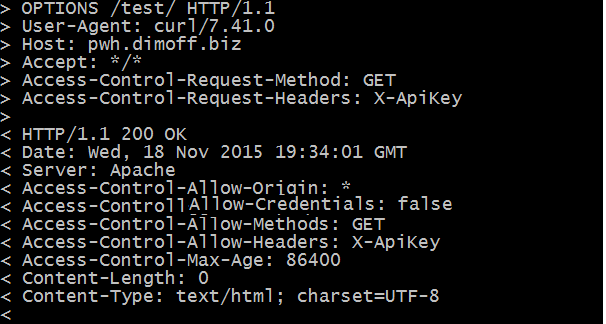
When requests start getting more complicated, we may want to know if a particular request method (such as get, put, post, patchor delete) or a particular custom header is allowed and accepted by the server. In this case, you may want to use preflights where you first send a request with the options method and declare what method and headers your request will have. Then, if the server returns CORS headers and we see that our origin, headers, and request methods are allowed, we can make the actual request (Origin is a header that is passed by our browsers with every cross-origin request we make. And no, we cannot change the Origin’s value when making a request in a typical browser).

As we can see in the image above, the server returns several headers which we can use in determining whether to make the actual request. It returns to us that all origins are allowed (Access-Control-Allow-Origin: *, that we cannot make the request while passing the user credentials (Access-Control-Allow-Credentials), that we can only make get requests (Access-Control-Allow-Methods) and that we may use the X-ApiKey custom header (Access-Control-Allow-Headers). Lastly, the Access-Control-Max-Age headers shows the value in seconds, pinpointing how long (from the time of the request) we can make requests without relying on another preflight.
On the other hand, in our front-end logic we pass the Access-Control-Request-Method and we pass the Access-Control-Request-Headers to indicate what kind of request method and what kind of headers we intend to add to our real request. In Vanilla JavaScript, you can attach a header when making Ajax calls using the xhr.setRequestHeader(‘headerString’, ‘headerValueString’);.
CORS for Canvas Images
If we want to load external images and edit them in canvas or just save their base64 encoded value in localStorage as a cache mechanism, the remote server has to enable CORS. There are various ways this can be done. One way is to edit your web server’s configuration to add the Access-Control-Allow-Origin header on every request for specific image types, such an example is shown in the Mozilla docs. If we have a script which dynamically generates images by changing the Content-Type and outputs an image such as we can simply set that header along with outputting the image.
Without CORS, if we try to access a remote image, load it in canvas, edit it and save it with toDataURL or just try to add the modified image to the DOM with toDataURL, we will get the following security exception (and we will not be able to save or show it): Image from origin ‘http://example.com‘ has been blocked from loading by Cross-Origin Resource Sharing policy: No ‘Access-Control-Allow-Origin’ header is present on the requested resource. Origin ‘http://localhost:63342‘ is therefore not allowed access.
If the server where the image is returns the image along with a Access-Control-Allow-Origin: * header, then we can do the following:
var img = new Image,
    canvas = document.createElement("canvas"),
    ctx = canvas.getContext("2d"),
    src = "http://example.com/test/image/image.php?image=1";
    img.setAttribute('crossOrigin', 'anonymous');
    img.onload = function() {
        canvas.width = img.width;
        canvas.height = img.height;
        ctx.drawImage( img, 0, 0 );
        ctx.font = "30px Arial";
        ctx.fillStyle = "#000";
        ctx.fillText("#SitePoint",canvas.width / 3,canvas.height / 3);
        img.src = canvas.toDataURL();
        document.querySelector("body").appendChild(img);
        localStorage.setItem( "savedImageData", canvas.toDataURL("image/png") );
    }
    img.src = src;
This will load an external image, add a #SitePoint text in it and both display it to the user and save it in localStorage. Notice that we set a crossOrigin attribute of the external image – img.setAttribute('crossOrigin', 'anonymous');. This attribute is mandatory and if we do not add it to the external image we will still get another security exception.

The Crossorigin Attribute
When we make requests for external images, audio, video, stylesheets and scripts using the appropriate HTML(5) tag we are not making a CORS request. This means that no Origin header is sent to the page serving the external resource. Without CORS, we would not be able to edit an external image in canvas, view exceptions and error logging from external scripts that our website loads, or use the CSS Object Model when working with external stylesheets and so on. There are certain cases when we want to use those features and this is where the crossorigin attribute that we mentioned above comes in handy.
The crossorigin attribute can be set to elements such as <link>,<img> and <script>. When we add the attribute to such an element, we make sure that a CORS request will be made with the Origin header set properly. If the external resource allows your origin through the Access-Control-Allow-Origin header the limitations to non-CORS requests will not apply.
The crossorigin attribute has two possible values:
anonymous– setting thecrossoriginattribute to this value will make a CORS request without passing the user’s credentials to the external resource (similar to making an Ajax CORS request without adding thewithCredentialsattribute).use-credentials– setting thecrossoriginattribute to this value will make a CORS request to the external resource along with any user credentials that might exist for that resource. For this to work, the server must not only set anAccess-Control-Allow-Originheader that allows yourOriginbut it must also setAccess-Control-Allow-Credentialstotrue.
User credentials include cookies, HTTP Basic Auth credentials, certificates and other user data that are sent when the user requests a specific website.
Conclusions
CORS enables developers to further interact with other systems and websites in order to create even better Web experiences. It can be used along with traditional requests made by popular HTML tags as well as with Web 2.0 technologies like Ajax.
Have you been using CORS in your projects? Did you have difficulties with it? We would like to know what your impressions of it are so far.
No comments:
Post a Comment