Try the following:
 RewriteEngine On
 RewriteCond %{HTTPS} !=on
 RewriteRule ^.*$ https://%{SERVER_NAME}%{REQUEST_URI} [R,L]
https://stackoverflow.com/questions/10489895/http-to-https-through-htaccess
Try the following:
RewriteEngine On
RewriteCond %{HTTPS} !=on
RewriteRule ^.*$ https://%{SERVER_NAME}%{REQUEST_URI} [R,L]
https://stackoverflow.com/questions/10489895/http-to-https-through-htaccess
RedHat by RedHat Inc. provides open source products for any to buy and use, for which the licenses can be free up until some extend. For features beyond that, one can always pay and purchase the licenses for extra features. Debian by Debian project provides free software products for anyone to access the licensed applications without any limitations for the accessible features. While RedHat releases products like Linux as a commercial distribution, Debian releases non-commercial products. The latest stable release from RedHat was version 7.5, available from April 10, ‘18, and Debian’s recent stable release was version 9.5, available from July 14, ’18.
Below is the top 12 difference between RedHat vs Debian

Both are popular choices in the market; let us discuss some of the major difference.
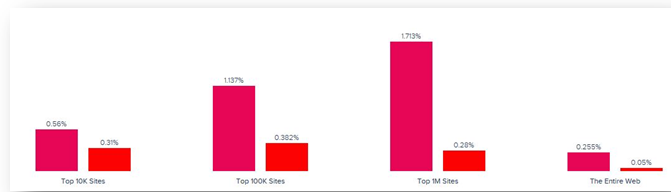
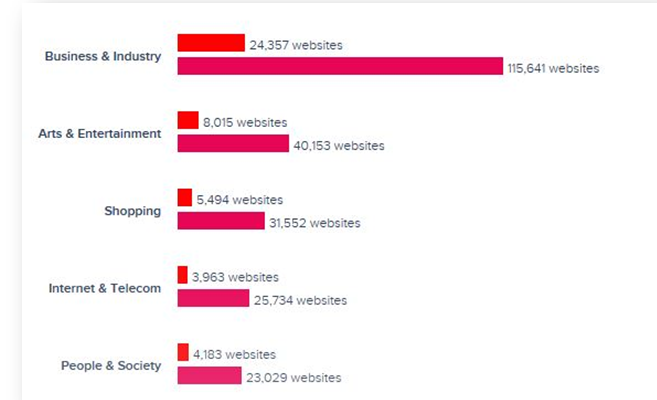

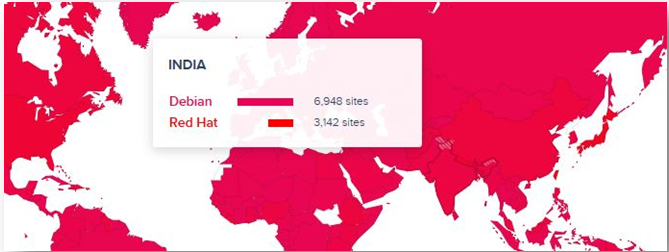
Below is the topmost comparison
| The basis of comparison | RedHat | Debian |
| Software Licence Type | Open Source | Free |
| Stable release(Latest) | 7.5, 6.10, 5.11 / April 10, 2018 | 9.5 (Stretch) (July 14, 2018) |
| Designed and developed | Red Hat Inc. | Debian Project (Software in the public interest). |
| OS family | Linux | Unix-like |
| Initial release | February 22, 2000 | September 1993 |
| Platforms | ARM64, Power Architecture; S/390; z/Architecture, | Amd64, is64, i386, arm64, armel, armhf, mipsel, ppc64, z/Architecture, RISC-V |
| Kernel Type | Monolithic (Linux) | Monolithic(Linux, kFreeBSD, micro, GNU hurd) |
| Distribution type | RedHat is Commercial Linux Distribution | Debian is Non-commercial Linux Distribution |
| Packages Type | RedHat uses the rpm package. RedHat uses the RPM package manager. | Debian uses the deb packages. Debian uses the dpkg package manager. |
| Resolver Type | RedHat uses a yum dependency resolver. | Debian uses the apt-get dependency resolver |
| Features | Virtualization possibilities(from Linux 5 onwards) Kernel and Performance – optimized multi-core processor, Dynamically switchable pre-queue I/O schedulers. Packaging for servers and Desktop, Security, Networking and Interoperability, Storage Management. | X.org 7.3 integration, a Renewed emphasis on security issues, Java friendly setup, |
| Mission/Vision | RedHat is an MNC company whose intentions are profit based on every package sales. | The Debian or Debian project is founded and developed by SPI(Software in the Public interest), a non-profit organisation. |
Server maintenance is very costly, and this applies to any company, no matter its size. The bigger the company, the more challenges will be there. Apart from server maintaining, other factors that contribute to challenges before a best-fit solution covers your organization is application stability, enterprise edition and its features, cost of installation. The intention is RedHat is stable and secure, but genuinely speaking, the Enterprise edition of RedHat makes your company spend thousands of bucks and, to some extent, get outdated software which makes it less preferable for companies. Debian popularity worldwide and its global acceptance due to ease of operation makes it preferable to many companies.
This Debian vs RedHat article covers some of the very critical deciding factors, which in my sense, clearly go in favour of Debian. One may disagree with this Debian vs RedHat article discussion, but one cannot escape the truth. The only intention behind this Debian vs RedHat article is to throw some lights on the availabilities and things both lack in terms of business and users. Each has its pro’s and cons. All the Debian distributions available presently are just because of the supportive community and user group.
Every framework has its own unique architecture but they have one thing in common. The entire page is divided into small components where the component has its own functionalities and UI. And sometimes, we need a way to communicate between these components.
Generally, we use Vuex (State management tool) to store the data and use it across components. But sometimes, we need a way to send the data from one component to another without using the Vuex store. In this article, we will learn the possible ways of achieving that.
There are five ways to send the data from one component to another:
Let’s study them one by one and see how they work.
One can send data from parent-to-child components using props. In the below example, we are sending the data from parent. vue to child. vue via the prop message.

We have created a component that prints the message. We have defined a variable in props called message which we are rendering in the template.
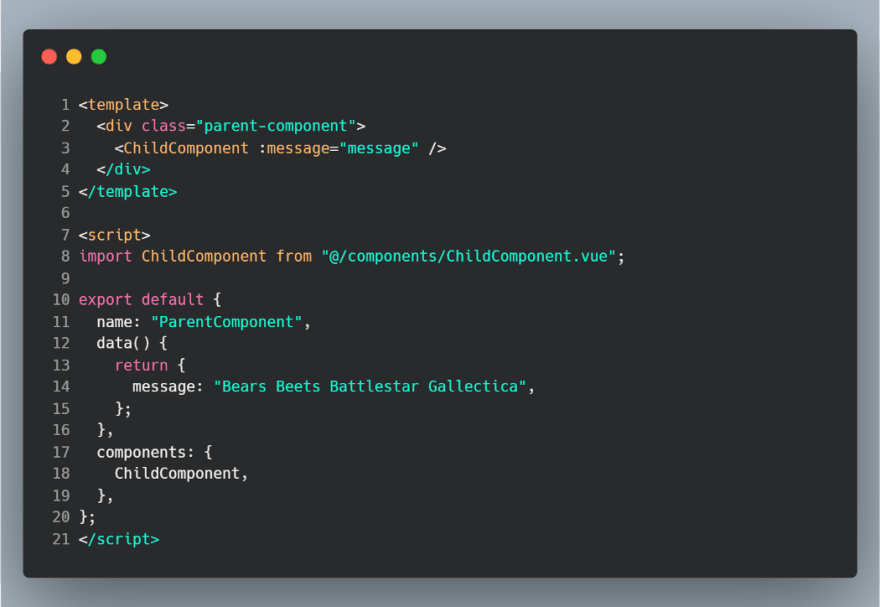
While we nest the child component inside our parent component, we are binding the data we want to send by using the directive v-bind and sending the data using props.
Any time the parent changes the prop, the new value is sent to the child and rerendered.
This is similar to props but we are sending the data from child to parent and instead of using v-bind, we are using directive v-on for capturing.
We have defined a variable in the child component which contains our message. We are sending the same to the parent component by firing an event from the child component.
this.$emit(’name-of-the-event’, args1, args2, args3,...) is a way to fire the event. This is captured on the parent component using directive v-on. Note that one should use the same event name they sent while capturing and can retrieve the arguments.


Any time the message in the child component changes, the new value is sent to the parent and rerendered.
An event bus is used to communicate between any two components (Components need not have a parent-child relationship). This can be used when one needs to manually listen for events on a component instance.
You can just send the data from one component using this.$root.$emit(’name-of-emitter’, args1, args2, ...) and is captured using the same name like this this.$root.$on(’name-of-emitter’, args1, args2, ...) in the other component.

Note that we are using mounted() {} to capture the event in component-two. vue.
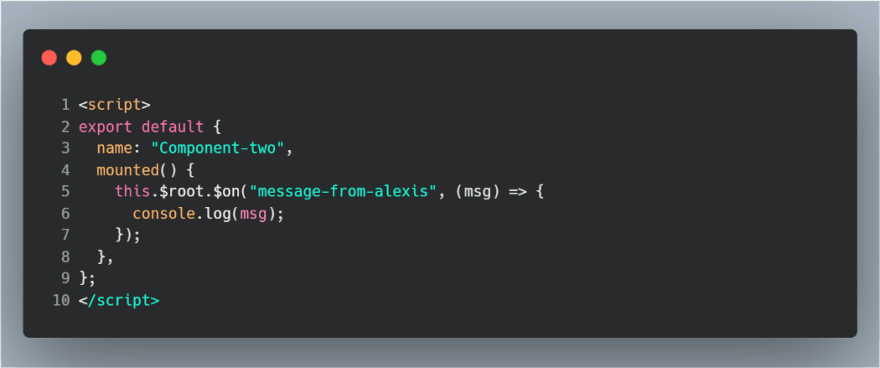
This is used in the structure where you have deeply nested components and you only need something from the parent component in the deeply nested child.
In that case, you still need to pass the prop down the whole component chain which might be annoying. For such cases, we can use the provide and inject pair.
Although the example we have here is very simple, we are still sending a message from parent to child and hence it works.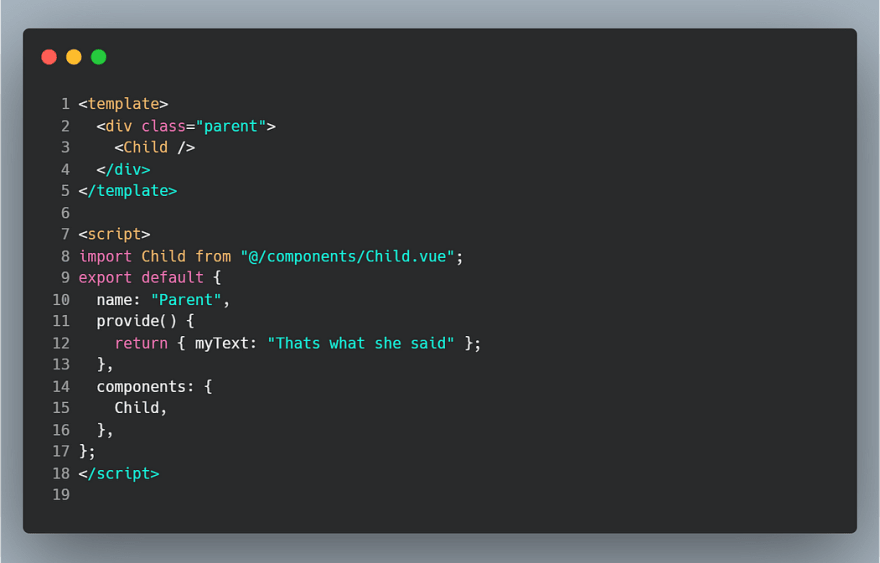
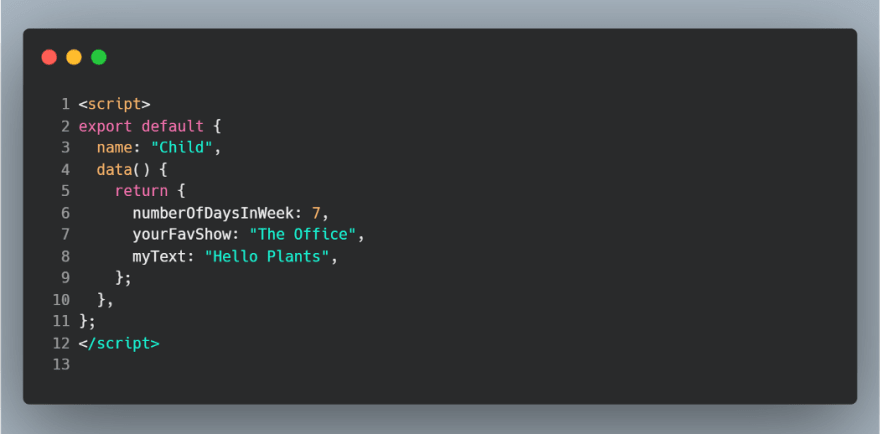
We are using our parent component as a provider, sending the data, and injecting it into the child component using the same name.

Parent components can serve as dependency providers for all its children, regardless of how deep the component hierarchy is.
This method is the least preferred way of making the communication but it is one of the options available.
Despite the other methods, sometimes you might still need to directly access a child component. To achieve this you can assign a reference ID to the child component using the ref attribute.

Here we are referencing the child component as ‘child’ (ref= child) (reference ID) and then capturing it using this.$refs.child. We can access anything related to the child component in this way.

And that sums it up. Comment below if you know other ways of communication between components in Vue.js. Thank you.
kShop project
has to three folders
1. Project
(App)
2. kshop-measurement-api
(Api)(python)
3. kShop
(php) this file save the mesurment in database
1. Project (App)
The app
which will use the API for mesurment.
2. kshop-measurement-api
This file holds the measurement calculation
code which is api based.
kshop-measurement-api
is made fully dockerised. So to run this api project your system must need
docker setup.
To run this API go to kshop-measurement-api folder and open
wsl command prompt if you are in windows OS.
Make Docker image and
run project in single command:
docker-compose
up -d --build
After
this command kshop-measurement-api
will
serve in
http://localhost:5000/
Later
command which you may needs after docker installation:
§ To see all docker images press: docker images
§ To see all containers : docker container ls
§ To stop all Docker containers, simply run the following command in your
terminal::
1. docker kill $(docker
ps -q)
2. docker rm $(docker ps
-a -q)
3. docker rmi $(docker
images -q)
3. kShop
This
project is fully made up with php for storing measurement data which was sended
by python kshop-measurement-api
Place
this project in htdocs or www folder so that kshop-measurement-api
can use this.
Note:
kshop-measurement-api project file __init__.py line 212 res
=
requests.post('http://192.168.1.198/kshop/api/measurement/create_measurement.php',
data=data)
You
needs to modify your localhosthost IP. (E.g. http://192.168.1.198)
This
project has a database name kshop. So to use this project import the database
also.
kShop Api
Test from postman
url: http://localhost:5000/upload
set
: header as below
x-api-key:eiWee8ep9due4deeshoa8Peichai8Eih
set:
body params as like below
image1: file.jpg
image2:file2.jpg
imga3:file3.jpg
customer_id:11
customer_gender:male
customer_age:22
customer_height:164
customer_weight:86
For Windows System requirements:
1. Enable
wsl2 feature in your windows.
2. Enable
virtualization to you system. (Docker desktop needs this feature)
3. Download
and install Docker Desktop
1. Enable wsl2 feature
WSL 2 (Windows subsystem for Linux) backend because Docker
must run in Linux environment for this you have to enable wsl2 in your windows.
Enable the WSL 2 feature on Windows. For detailed
instructions, refer to the (https://docs.microsoft.com/en-us/windows/wsl/install).
The following hardware prerequisites are required to
successfully run WSL 2 on Windows 10 or Windows 11:
·
For Windows 11 64-bit: Home or Pro
version 21H2 or higher, or Enterprise or Education version 21H2 or higher.
·
For Windows 10 64-bit: Home or Pro 2004
(build 19041) or higher, or Enterprise or Education 1909 (build 18363) or
higher.
·
4GB system RAM
After you successfully install and setup wsl2 you
will get wsl command prompt as like windows command prompt form search menu or
any other place. With this terminal you can place Linux command in windows.
2. Enable virtualization
BIOS-level hardware
virtualization support must be enabled in the BIOS settings. For detail info
read this info: https://docs.docker.com/desktop/windows/troubleshoot/#virtualization-must-be-enabled
If your bios level virtualization is turned off then
you have to turn it on.
To see virtualization is enable or not go to task
manager by pressing ctrl+shif+esc button then go to performance tab.
See this article: https://mashtips.com/enable-virtualization-windows-10/
3. Download and install Docker Desktop
Download from here: (https://docs.docker.com/desktop/windows/install/)
For Linux