Tuesday, February 25, 2020

Laravel category and childcategory Recursive relations

Eloquent: Recursive hasMany Relationship with Unlimited Subcategories

Quite often in e-shops you can see many level of categories and subcategories, sometimes even unlimited. This article will show you how to achieve it elegantly with Laravel Eloquent.
We will be building a mini-project to views children shop sub-categories, five level deep, like this:

Database Migration

Here’s a simple schema of DB table:
Schema::create('categories', function (Blueprint $table) {
    $table->bigIncrements('id');
    $table->string('name');
    $table->unsignedBigInteger('category_id')->nullable();
    $table->foreign('category_id')->references('id')->on('categories');
    $table->timestamps();
});
We just have a name field, and then relationship to the table itself. So most parent category will have category_id = NULL, and every other sub-category will have its own parent_id.
Here’s our data in the database:

Eloquent Model and Relationships

First, in app/Category.php we add a simple hasMany() method, so category may have other subcategories:
class Category extends Model
{

    public function categories()
    {
        return $this->hasMany(Category::class);
    }

}
Now comes the biggest “trick” of the article. Did you know that you can describe recursive relationship? Like this:
public function childrenCategories()
{
    return $this->hasMany(Category::class)->with('categories');
}
So, if you call Category::with(‘categories’), it will get you one level of “children”, but Category::with(‘childrenCategories’) will give you as many levels as it could find.

Route and Controller method

Now, let’s try to show all the categories and subcategories, as in the example above.
In routes/web.php, we add this:
Route::get('categories', 'CategoryController@index');
Then, app/Http/CategoryController.php looks like this:
public function index()
{
    $categories = Category::whereNull('category_id')
        ->with('childrenCategories')
        ->get();
    return view('categories', compact('categories'));
}
As you can see, we’re loading only parent categories, with children as relationships. Simple, huh?

View and Recursive Sub-View

Finally, to the Views structure. Here’s our resources/views/categories.blade.php:
    @foreach ($categories as $category)
  • {{ $category->name }}
    • @foreach ($category->childrenCategories as $childCategory) @include('child_category', ['child_category' => $childCategory]) @endforeach
    @endforeach
As you can see, we load the main categories, and then load children categories with @include.
The best part is that resources/views/admin/child_category.blade.php will use recursive loading of itself. See the code:

  • {{ $child_category->name }}
  • @if ($child_category->categories)
      @foreach ($child_category->categories as $childCategory) @include('child_category', ['child_category' => $childCategory]) @endforeach
    @endif
    As you can see, inside of child_category.blade.php we have @include(‘child_category’), so the template is recursively loading children, as long as there are categories inside of the current child category.

    And, that’s it! We have unlimited level of subcategories – in database, in Eloquent relationships, and in Views.
    https://laraveldaily.com/eloquent-recursive-hasmany-relationship-with-unlimited-subcategories/


    Laravel spark

    Spark is a Laravel package that provides scaffolding for all of the stuff you don't want to code. Subscription billing? We got that. Invoices? No problem.
    We even take care of authentication, password reset, team billing, two-factor authentication, profile photos, and more. It's the perfect starting point for your next big idea.

    https://spark.laravel.com/

    Saturday, February 22, 2020

    Laravel: implement infinite ajax scroll pagination

    Step 1: Add Table and Model
    we require to create new table "posts" that way we will get data from this table, you can use your own table but this is for example. we have to create migration for posts table using Laravel 5 php artisan command, so first fire bellow command:
    php artisan make:migration create_post_table
    After this command you will find one file in following path database/migrations and you have to put bellow code in your migration file for create posts table.
    use Illuminate\Database\Schema\Blueprint;
    use Illuminate\Database\Migrations\Migration;
    class CreatePostTable extends Migration
    {
    /**
    * Run the migrations.
    *
    * @return void
    */
    public function up()
    {
    Schema::create('posts', function (Blueprint $table) {
    $table->increments('id');
    $table->string('title');
    $table->text('description');
    $table->timestamps();
    });
    }
    /**
    * Reverse the migrations.
    *
    * @return void
    */
    public function down()
    {
    Schema::drop("posts");
    }
    }
    Ok, now we have to run migration using laravel artisan command:
    php artisan migrate
    Now, we require to create table model for posts table, so fist create new Post.php in your app directory as like bellow:
    app/Post.php
    namespace App;
    use Illuminate\Database\Eloquent\Model;
    class Post extends Model
    {
    public $fillable = ['title','description'];
    }
    Step 2: Add Route
    In this is step we need to add route for generate view. so open your app/Http/routes.php file and add following route.
    Route::get('my-post', 'PostController@myPost');
    Step 3: Create Controller
    If you haven't PostController then we should create new controller as PostController in this path app/Http/Controllers/PostController.php. Make sure you should have posts table with some data. this controller will manage data and view file, so put bellow content in controller file:
    app/Http/Controllers/PostController.php
    namespace App\Http\Controllers;
    use Illuminate\Http\Request;
    use App\Http\Requests;
    use App\Post;
    class PostController extends Controller
    {
    public function myPost(Request $request)
    {
    $posts = Post::paginate(5);
    if ($request->ajax()) {
    $view = view('data',compact('posts'))->render();
    return response()->json(['html'=>$view]);
    }
    return view('my-post',compact('posts'));
    }
    }
    Step 4: Create View Files
    In last step, we have to create view two file "my-post.blade.php" for main view and another for data, so first create my-post.blade.php file:
    resources/view/my-post.php
    </span><span class="pln" style="box-sizing: border-box; color: rgb(255, 255, 255);">Laravel infinite scroll pagination</span><span class="tag" style="box-sizing: border-box; color: rgb(240, 230, 140); font-weight: bold;">
    rel="stylesheet" href="https://maxcdn.bootstrapcdn.com/bootstrap/3.3.6/css/bootstrap.min.css">

    class="container">

    class="text-center">Laravel infinite scroll pagination


    class="col-md-12" id="post-data">
    @include('data')

    class="ajax-load text-center" style="display:none">
    src="http://demo.itsolutionstuff.com/plugin/loader.gif">Loading More post


    resources/view/data.php
    @foreach($posts as $post)
    {{ str_limit($post->description, 400) }}

    class="text-right">


    style="margin-top:5px;">
    @endforeach
    Ok, now you can check and test.....

    https://www.itsolutionstuff.com/post/how-to-implement-infinite-ajax-scroll-pagination-in-laravel-5example.html

    Sunday, February 16, 2020

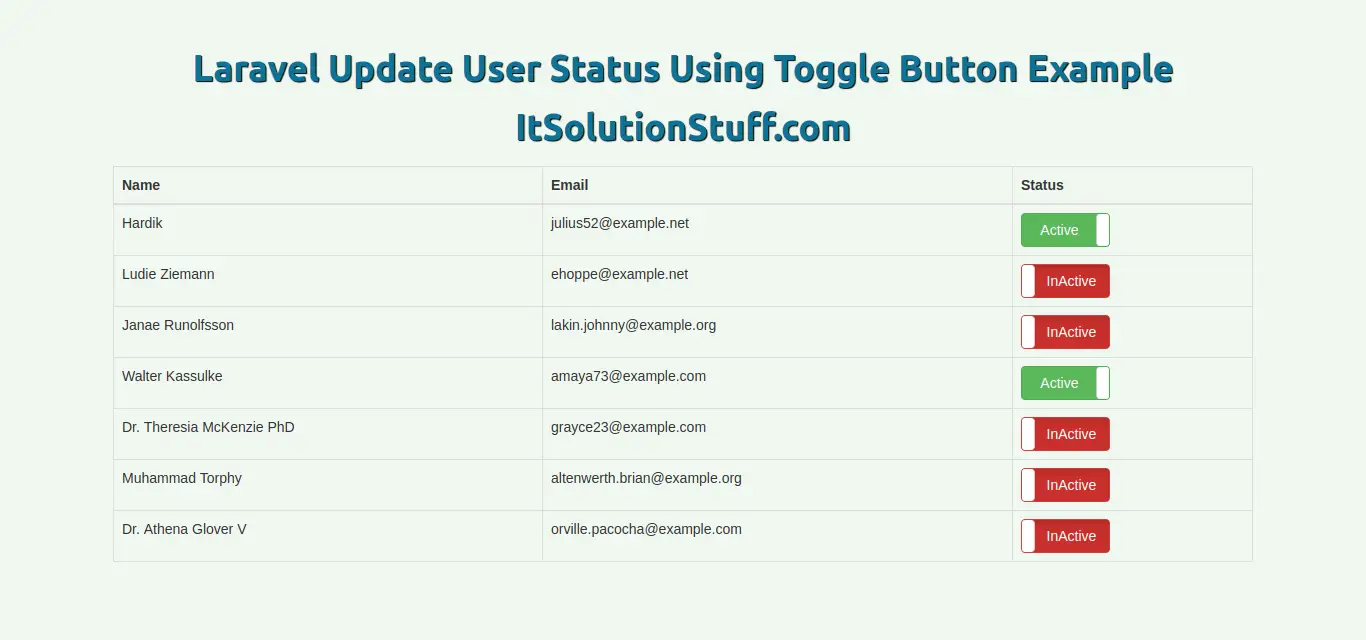
    Laravel Update User Status Using Toggle Button Example

    In this tutorial, i would like to show you how to create functionality to active and inactive status in laravel 5 application. we can implement change status using ajax with bootstrap toggle button in laravel 5. here we will update user status active inactive with boolean data type with 0 and 1.
    We almost require to create status change functionality in out laravel application. it might be require for user status, product status, category status etc. we have always two yes or no, enable or disabled, active and inactive etc. you can do it this toggle stuff using jquery ajax.
    In this example we will create users listing page and give bootstrap toggle button using bootstrap-toggle js. so you can easily enable and disabled it. using bootstrap-toggle js change event we will write jquery ajax code and fire get or post request to change user statue field on database.
    So, let's see follow few step and get status change functionality with example, bellow also attach screen shot of layout.
    Preview:
    Step 1: Install Laravel 5.8
    In this step, if you haven't laravel 5.8 application setup then we have to get fresh laravel 5.8 application. So run bellow command and get clean fresh laravel 5.8 application.
    composer create-project --prefer-dist laravel/laravel toggleLaravel
    Step 2: Create Routes
    In this, step we need to create route for user listing and another one for save data. so open your routes/web.php file and add following route.
    routes/web.php
    Route::get('users', 'UserController@index');
    Route::get('changeStatus', 'UserController@changeStatus');
    Step 3: Create Controller
    In this point, now we should create new controller as UserController. this controller will manage layout and getting data request and return response, so put bellow content in controller file:
    app/Http/Controllers/UserController.php
    php
    namespace App\Http\Controllers;
    use Illuminate\Http\Request;
    use App\User;
    class UserController extends Controller
    {
    /**
    * Responds with a welcome message with instructions
    *
    * @return \Illuminate\Http\Response
    */
    public function index()
    {
    $users = User::get();
    return view('users',compact('users'));
    }
    /**
    * Responds with a welcome message with instructions
    *
    * @return \Illuminate\Http\Response
    */
    public function changeStatus(Request $request)
    {
    $user = User::find($request->user_id);
    $user->status = $request->status;
    $user->save();
    return response()->json(['success'=>'Status change successfully.']);
    }
    }
    Step 4: Create View
    In Last step, let's create users.blade.php(resources/views/users.blade.php) for layout and we will write design code here and put following code:
    resources/views/users.blade.php
    </span><span class="pln" style="box-sizing: border-box; color: rgb(255, 255, 255);">Laravel Update User Status Using Toggle Button Example - ItSolutionStuff.com</span><span class="tag" style="box-sizing: border-box; color: rgb(240, 230, 140); font-weight: bold;">
    rel="stylesheet" href="https://cdnjs.cloudflare.com/ajax/libs/twitter-bootstrap/3.3.7/css/bootstrap.min.css" />
    href="https://gitcdn.github.io/bootstrap-toggle/2.2.2/css/bootstrap-toggle.min.css" rel="stylesheet">

    class="container">

    Laravel Update User Status Using Toggle Button Example - ItSolutionStuff.com
    class="table table-bordered">
    Name
    Email
    Status

    @foreach($users as $user)
    {{ $user->name }}
    {{ $user->email }}
    data-id="{{$user->id}}" class="toggle-class" type="checkbox" data-onstyle="success" data-offstyle="danger" data-toggle="toggle" data-on="Active" data-off="InActive" {{ $user->status ? 'checked' : '' }}>
    @endforeach


    https://www.itsolutionstuff.com/post/laravel-update-user-status-using-toggle-button-exampleexample.html