Saturday, February 22, 2020

Laravel: implement infinite ajax scroll pagination

Step 1: Add Table and Model
we require to create new table "posts" that way we will get data from this table, you can use your own table but this is for example. we have to create migration for posts table using Laravel 5 php artisan command, so first fire bellow command:
php artisan make:migration create_post_table
After this command you will find one file in following path database/migrations and you have to put bellow code in your migration file for create posts table.
use Illuminate\Database\Schema\Blueprint;
use Illuminate\Database\Migrations\Migration;
class CreatePostTable extends Migration
{
/**
* Run the migrations.
*
* @return void
*/
public function up()
{
Schema::create('posts', function (Blueprint $table) {
$table->increments('id');
$table->string('title');
$table->text('description');
$table->timestamps();
});
}
/**
* Reverse the migrations.
*
* @return void
*/
public function down()
{
Schema::drop("posts");
}
}
Ok, now we have to run migration using laravel artisan command:
php artisan migrate
Now, we require to create table model for posts table, so fist create new Post.php in your app directory as like bellow:
app/Post.php
namespace App;
use Illuminate\Database\Eloquent\Model;
class Post extends Model
{
public $fillable = ['title','description'];
}
Step 2: Add Route
In this is step we need to add route for generate view. so open your app/Http/routes.php file and add following route.
Route::get('my-post', 'PostController@myPost');
Step 3: Create Controller
If you haven't PostController then we should create new controller as PostController in this path app/Http/Controllers/PostController.php. Make sure you should have posts table with some data. this controller will manage data and view file, so put bellow content in controller file:
app/Http/Controllers/PostController.php
namespace App\Http\Controllers;
use Illuminate\Http\Request;
use App\Http\Requests;
use App\Post;
class PostController extends Controller
{
public function myPost(Request $request)
{
$posts = Post::paginate(5);
if ($request->ajax()) {
$view = view('data',compact('posts'))->render();
return response()->json(['html'=>$view]);
}
return view('my-post',compact('posts'));
}
}
Step 4: Create View Files
In last step, we have to create view two file "my-post.blade.php" for main view and another for data, so first create my-post.blade.php file:
resources/view/my-post.php
</span><span class="pln" style="box-sizing: border-box; color: rgb(255, 255, 255);">Laravel infinite scroll pagination</span><span class="tag" style="box-sizing: border-box; color: rgb(240, 230, 140); font-weight: bold;">
rel="stylesheet" href="https://maxcdn.bootstrapcdn.com/bootstrap/3.3.6/css/bootstrap.min.css">

class="container">

class="text-center">Laravel infinite scroll pagination


class="col-md-12" id="post-data">
@include('data')

class="ajax-load text-center" style="display:none">
src="http://demo.itsolutionstuff.com/plugin/loader.gif">Loading More post


resources/view/data.php
@foreach($posts as $post)
{{ str_limit($post->description, 400) }}

class="text-right">


style="margin-top:5px;">
@endforeach
Ok, now you can check and test.....

https://www.itsolutionstuff.com/post/how-to-implement-infinite-ajax-scroll-pagination-in-laravel-5example.html
Sunday, February 16, 2020

Laravel Update User Status Using Toggle Button Example

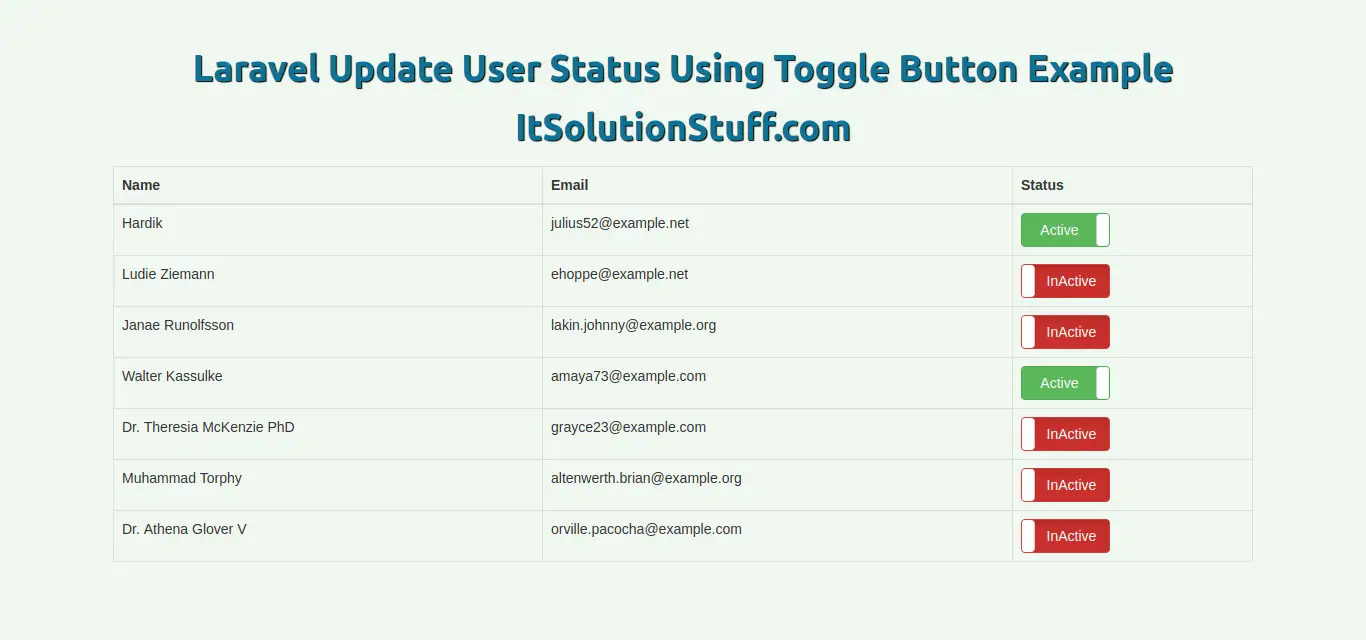
In this tutorial, i would like to show you how to create functionality to active and inactive status in laravel 5 application. we can implement change status using ajax with bootstrap toggle button in laravel 5. here we will update user status active inactive with boolean data type with 0 and 1.
We almost require to create status change functionality in out laravel application. it might be require for user status, product status, category status etc. we have always two yes or no, enable or disabled, active and inactive etc. you can do it this toggle stuff using jquery ajax.
In this example we will create users listing page and give bootstrap toggle button using bootstrap-toggle js. so you can easily enable and disabled it. using bootstrap-toggle js change event we will write jquery ajax code and fire get or post request to change user statue field on database.
So, let's see follow few step and get status change functionality with example, bellow also attach screen shot of layout.
Preview:
Step 1: Install Laravel 5.8
In this step, if you haven't laravel 5.8 application setup then we have to get fresh laravel 5.8 application. So run bellow command and get clean fresh laravel 5.8 application.
composer create-project --prefer-dist laravel/laravel toggleLaravel
Step 2: Create Routes
In this, step we need to create route for user listing and another one for save data. so open your routes/web.php file and add following route.
routes/web.php
Route::get('users', 'UserController@index');
Route::get('changeStatus', 'UserController@changeStatus');
Step 3: Create Controller
In this point, now we should create new controller as UserController. this controller will manage layout and getting data request and return response, so put bellow content in controller file:
app/Http/Controllers/UserController.php
php
namespace App\Http\Controllers;
use Illuminate\Http\Request;
use App\User;
class UserController extends Controller
{
/**
* Responds with a welcome message with instructions
*
* @return \Illuminate\Http\Response
*/
public function index()
{
$users = User::get();
return view('users',compact('users'));
}
/**
* Responds with a welcome message with instructions
*
* @return \Illuminate\Http\Response
*/
public function changeStatus(Request $request)
{
$user = User::find($request->user_id);
$user->status = $request->status;
$user->save();
return response()->json(['success'=>'Status change successfully.']);
}
}
Step 4: Create View
In Last step, let's create users.blade.php(resources/views/users.blade.php) for layout and we will write design code here and put following code:
resources/views/users.blade.php
</span><span class="pln" style="box-sizing: border-box; color: rgb(255, 255, 255);">Laravel Update User Status Using Toggle Button Example - ItSolutionStuff.com</span><span class="tag" style="box-sizing: border-box; color: rgb(240, 230, 140); font-weight: bold;">
rel="stylesheet" href="https://cdnjs.cloudflare.com/ajax/libs/twitter-bootstrap/3.3.7/css/bootstrap.min.css" />
href="https://gitcdn.github.io/bootstrap-toggle/2.2.2/css/bootstrap-toggle.min.css" rel="stylesheet">

class="container">

Laravel Update User Status Using Toggle Button Example - ItSolutionStuff.com
class="table table-bordered">
Name
Email
Status

@foreach($users as $user)
{{ $user->name }}
{{ $user->email }}
data-id="{{$user->id}}" class="toggle-class" type="checkbox" data-onstyle="success" data-offstyle="danger" data-toggle="toggle" data-on="Active" data-off="InActive" {{ $user->status ? 'checked' : '' }}>
@endforeach


https://www.itsolutionstuff.com/post/laravel-update-user-status-using-toggle-button-exampleexample.html

Laravel devtricks