Saturday, December 14, 2019

Laravel: Laravel Update User Status Using Toggle Button Example


In this tutorial, i would like to show you how to create functionality to active and inactive status in laravel 5 application. we can implement change status using ajax with bootstrap toggle button in laravel 5. here we will update user status active inactive with boolean data type with 0 and 1.
We almost require to create status change functionality in out laravel application. it might be require for user status, product status, category status etc. we have always two yes or no, enable or disabled, active and inactive etc. you can do it this toggle stuff using jquery ajax.
In this example we will create users listing page and give bootstrap toggle button using bootstrap-toggle js. so you can easily enable and disabled it. using bootstrap-toggle js change event we will write jquery ajax code and fire get or post request to change user statue field on database.
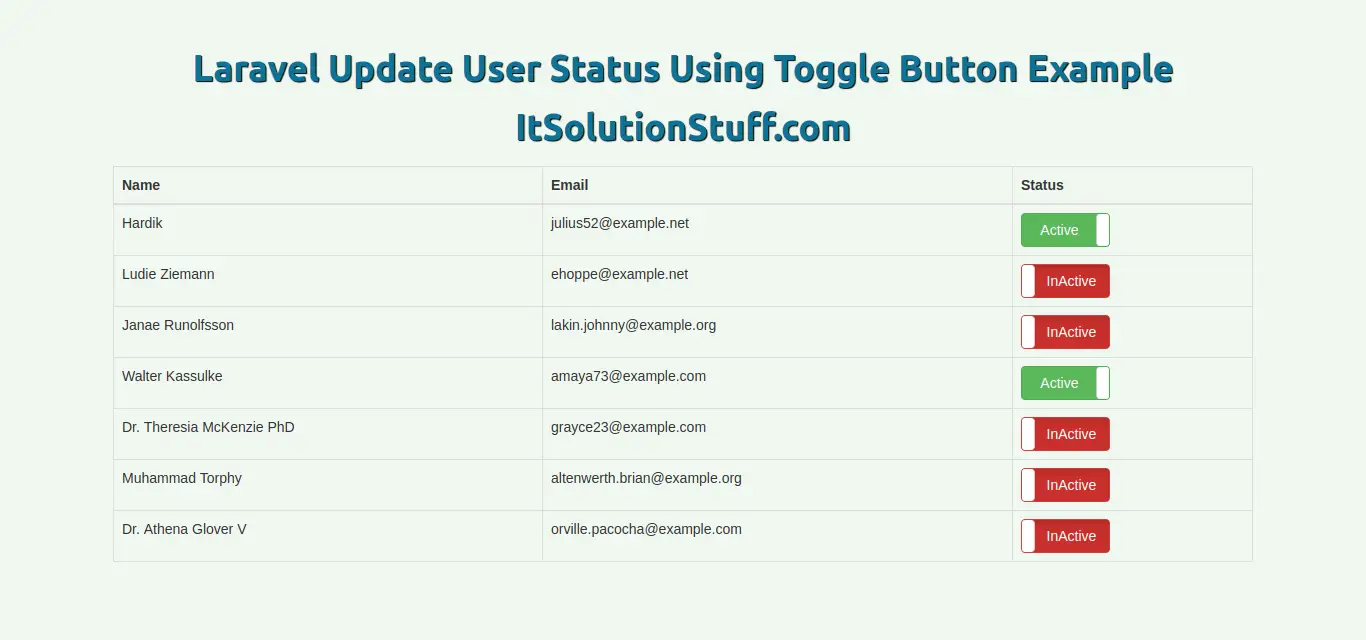
So, let's see follow few step and get status change functionality with example, bellow also attach screen shot of layout.
Preview:
Step 1: Install Laravel 5.8
In this step, if you haven't laravel 5.8 application setup then we have to get fresh laravel 5.8 application. So run bellow command and get clean fresh laravel 5.8 application.
composer create-project --prefer-dist laravel/laravel toggleLaravel
Step 2: Create Routes
In this, step we need to create route for user listing and another one for save data. so open your routes/web.php file and add following route.
routes/web.php
Route::get('users', 'UserController@index');
Route::get('changeStatus', 'UserController@changeStatus');
Step 3: Create Controller
In this point, now we should create new controller as UserController. this controller will manage layout and getting data request and return response, so put bellow content in controller file:
app/Http/Controllers/UserController.php
<?php
namespace App\Http\Controllers;
use Illuminate\Http\Request;
use App\User;
class UserController extends Controller
{
/**
* Responds with a welcome message with instructions
*
* @return \Illuminate\Http\Response
*/
public function index()
{
$users = User::get();
return view('users',compact('users'));
}
/**
* Responds with a welcome message with instructions
*
* @return \Illuminate\Http\Response
*/
public function changeStatus(Request $request)
{
$user = User::find($request->user_id);
$user->status = $request->status;
$user->save();
return response()->json(['success'=>'Status change successfully.']);
}
}
Step 4: Create View
In Last step, let's create users.blade.php(resources/views/users.blade.php) for layout and we will write design code here and put following code:
resources/views/users.blade.php
<!DOCTYPE html>
<html>
<head>
<title>Laravel Update User Status Using Toggle Button Example - ItSolutionStuff.com</title>
<script src="https://cdnjs.cloudflare.com/ajax/libs/jquery/3.4.1/jquery.min.js" ></script>
<link rel="stylesheet" href="https://cdnjs.cloudflare.com/ajax/libs/twitter-bootstrap/3.3.7/css/bootstrap.min.css" />
<link href="https://gitcdn.github.io/bootstrap-toggle/2.2.2/css/bootstrap-toggle.min.css" rel="stylesheet">
<script src="https://gitcdn.github.io/bootstrap-toggle/2.2.2/js/bootstrap-toggle.min.js"></script>
</head>
<body>
<div class="container">
<h1>Laravel Update User Status Using Toggle Button Example - ItSolutionStuff.com</h1>
<table class="table table-bordered">
<thead>
<tr>
<th>Name</th>
<th>Email</th>
<th>Status</th>
</tr>
</thead>
<tbody>
@foreach($users as $user)
<tr>
<td>{{ $user->name }}</td>
<td>{{ $user->email }}</td>
<td>
<input data-id="{{$user->id}}" class="toggle-class" type="checkbox" data-onstyle="success" data-offstyle="danger" data-toggle="toggle" data-on="Active" data-off="InActive" {{ $user->status ? 'checked' : '' }}>
</td>
</tr>
@endforeach
</tbody>
</table>
</div>
</body>
<script>
$(function() {
$('.toggle-class').change(function() {
var status = $(this).prop('checked') == true ? 1 : 0;
var user_id = $(this).data('id');
$.ajax({
type: "GET",
dataType: "json",
url: '/changeStatus',
data: {'status': status, 'user_id': user_id},
success: function(data){
console.log(data.success)
}
});
})
})
</script>
</html>

Now we are ready to run our example so run bellow command ro quick run:
php artisan serve
Now you can open bellow url on your browser:
http://localhost:8000/users
You can get download this example from here: Click Here.
I hope it can help you...

link : https://www.itsolutionstuff.com/post/laravel-update-user-status-using-toggle-button-exampleexample.html

Saturday, December 7, 2019

Laravel 5.7 - New Notification System Tutorial for Beginner

Laravel 5 added new feature as notification system with mail, database, sms, markdown, broadcast, slack etc. in this tutorial i will show you simple example demo of email notification system in laravel 5.7 application. you can also send all users notification at a time by using new notification system.
Laravel Notification can be by mail, database, sms or slack. we can easily create Notification by laravel artisan command. we can easily customization of notification like mail subject, mail body, main action etc. we almost require to use notification when we work on large amount of project like e-commerce. might be you need to send notification for payment receipt, order place receipt, invoice etc.
In this example we will create email notification and send it to particular user, than we saved to database. So, you need to follow few step to make basic example with notification.
Step 1: Download Laravel 5.7
I am going to explain step by step from scratch so, we need to get fresh Laravel 5.7 application using bellow command, So open your terminal OR command prompt and run bellow command:
composer create-project --prefer-dist laravel/laravel blog
Step 2: Create Database Table
In this step, we need to create "notifications" table by using laravel 5 artisan command, so let's run bellow command:
php artisan notifications:table
php artisan migrate
In this step, we need to create "Notification" by using laravel 5 artisan command, so let's run bellow command, we will create MyFirstNotification.
php artisan make:notification MyFirstNotification
now you can see new folder will create as "Notifications" in app folder. You need to make following changes as like bellow class.
app/Notifications/MyFirstNotification.php
<?php
namespace App\Notifications;
use Illuminate\Bus\Queueable;
use Illuminate\Notifications\Notification;
use Illuminate\Contracts\Queue\ShouldQueue;
use Illuminate\Notifications\Messages\MailMessage;
class MyFirstNotification extends Notification
{
use Queueable;
private $details;
/**
* Create a new notification instance.
*
* @return void
*/
public function __construct($details)
{
$this->details = $details;
}
/**
* Get the notification's delivery channels.
*
* @param mixed $notifiable
* @return array
*/
public function via($notifiable)
{
return ['mail','database'];
}
/**
* Get the mail representation of the notification.
*
* @param mixed $notifiable
* @return \Illuminate\Notifications\Messages\MailMessage
*/
public function toMail($notifiable)
{
return (new MailMessage)
->greeting($this->details['greeting'])
->line($this->details['body'])
->action($this->details['actionText'], $this->details['actionURL'])
->line($this->details['thanks']);
}
/**
* Get the array representation of the notification.
*
* @param mixed $notifiable
* @return array
*/
public function toDatabase($notifiable)
{
return [
'order_id' => $this->details['order_id']
];
}
}
Step 4: Create Route
In this is step we need to create routes for sending notification to one user. so open your "routes/web.php" file and add following route.
routes/web.php
Route::get('send', 'HomeController@sendNotification');
Step 4: Create Controller
Here,we require to create new controller HomeController that will manage generatePDF method of route. So let's put bellow code.
app/Http/Controllers/HomeController.php
<?php
namespace App\Http\Controllers;
use Illuminate\Http\Request;
use App\User;
use Notification;
use App\Notifications\MyFirstNotification;
class HomeController extends Controller
{
/**
* Create a new controller instance.
*
* @return void
*/
public function __construct()
{
$this->middleware('auth');
}
/**
* Show the application dashboard.
*
* @return \Illuminate\Contracts\Support\Renderable
*/
public function index()
{
return view('home');
}
public function sendNotification()
{
$user = User::first();
$details = [
'greeting' => 'Hi Artisan',
'body' => 'This is my first notification from ItSolutionStuff.com',
'thanks' => 'Thank you for using ItSolutionStuff.com tuto!',
'actionText' => 'View My Site',
'actionURL' => url('/'),
'order_id' => 101
];
Notification::send($user, new MyFirstNotification($details));
dd('done');
}
}
Now we are ready to send first notification to user. so let's run our example so run bellow command for quick run:
php artisan serve
you can run following url:
http://localhost:8000/send
you can also send notification like this way:
$user->notify(new MyFirstNotification($details));
you can get sent notifications by following command:
dd($user->notifications);
I hope it can help you....