Saturday, December 14, 2019

Laravel: Laravel Update User Status Using Toggle Button Example


In this tutorial, i would like to show you how to create functionality to active and inactive status in laravel 5 application. we can implement change status using ajax with bootstrap toggle button in laravel 5. here we will update user status active inactive with boolean data type with 0 and 1.
We almost require to create status change functionality in out laravel application. it might be require for user status, product status, category status etc. we have always two yes or no, enable or disabled, active and inactive etc. you can do it this toggle stuff using jquery ajax.
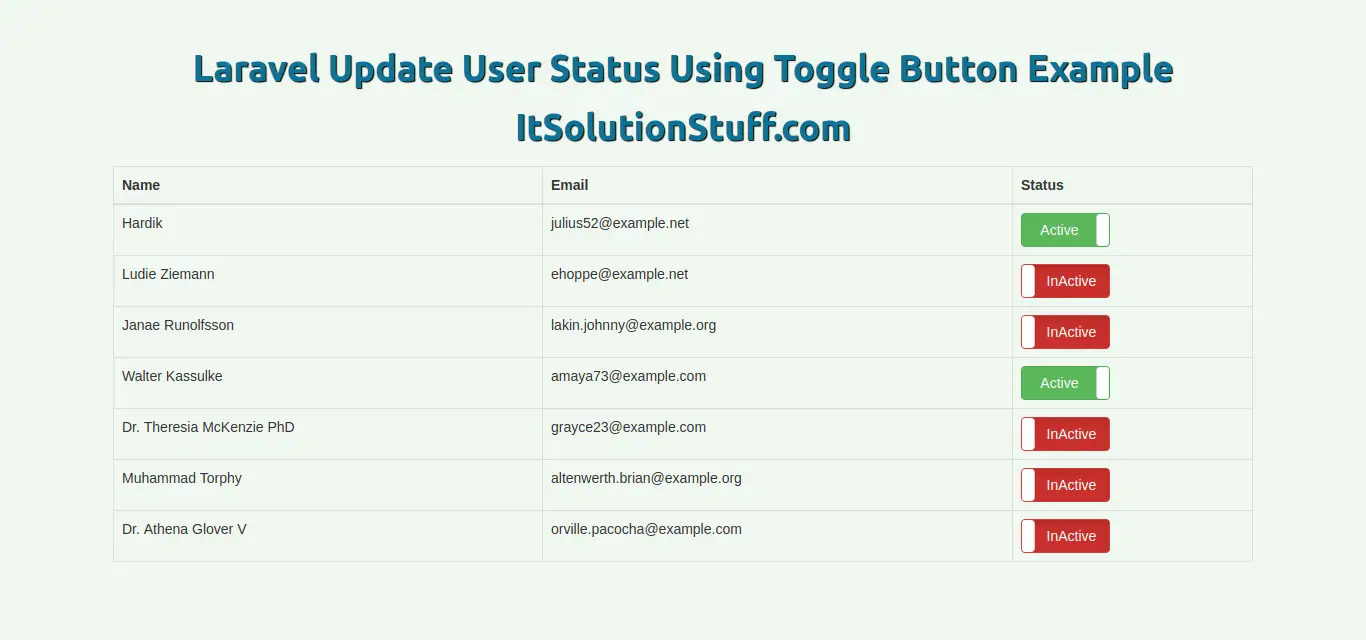
In this example we will create users listing page and give bootstrap toggle button using bootstrap-toggle js. so you can easily enable and disabled it. using bootstrap-toggle js change event we will write jquery ajax code and fire get or post request to change user statue field on database.
So, let's see follow few step and get status change functionality with example, bellow also attach screen shot of layout.
Preview:
Step 1: Install Laravel 5.8
In this step, if you haven't laravel 5.8 application setup then we have to get fresh laravel 5.8 application. So run bellow command and get clean fresh laravel 5.8 application.
composer create-project --prefer-dist laravel/laravel toggleLaravel
Step 2: Create Routes
In this, step we need to create route for user listing and another one for save data. so open your routes/web.php file and add following route.
routes/web.php
Route::get('users', 'UserController@index');
Route::get('changeStatus', 'UserController@changeStatus');
Step 3: Create Controller
In this point, now we should create new controller as UserController. this controller will manage layout and getting data request and return response, so put bellow content in controller file:
app/Http/Controllers/UserController.php
<?php
namespace App\Http\Controllers;
use Illuminate\Http\Request;
use App\User;
class UserController extends Controller
{
/**
* Responds with a welcome message with instructions
*
* @return \Illuminate\Http\Response
*/
public function index()
{
$users = User::get();
return view('users',compact('users'));
}
/**
* Responds with a welcome message with instructions
*
* @return \Illuminate\Http\Response
*/
public function changeStatus(Request $request)
{
$user = User::find($request->user_id);
$user->status = $request->status;
$user->save();
return response()->json(['success'=>'Status change successfully.']);
}
}
Step 4: Create View
In Last step, let's create users.blade.php(resources/views/users.blade.php) for layout and we will write design code here and put following code:
resources/views/users.blade.php
<!DOCTYPE html>
<html>
<head>
<title>Laravel Update User Status Using Toggle Button Example - ItSolutionStuff.com</title>
<script src="https://cdnjs.cloudflare.com/ajax/libs/jquery/3.4.1/jquery.min.js" ></script>
<link rel="stylesheet" href="https://cdnjs.cloudflare.com/ajax/libs/twitter-bootstrap/3.3.7/css/bootstrap.min.css" />
<link href="https://gitcdn.github.io/bootstrap-toggle/2.2.2/css/bootstrap-toggle.min.css" rel="stylesheet">
<script src="https://gitcdn.github.io/bootstrap-toggle/2.2.2/js/bootstrap-toggle.min.js"></script>
</head>
<body>
<div class="container">
<h1>Laravel Update User Status Using Toggle Button Example - ItSolutionStuff.com</h1>
<table class="table table-bordered">
<thead>
<tr>
<th>Name</th>
<th>Email</th>
<th>Status</th>
</tr>
</thead>
<tbody>
@foreach($users as $user)
<tr>
<td>{{ $user->name }}</td>
<td>{{ $user->email }}</td>
<td>
<input data-id="{{$user->id}}" class="toggle-class" type="checkbox" data-onstyle="success" data-offstyle="danger" data-toggle="toggle" data-on="Active" data-off="InActive" {{ $user->status ? 'checked' : '' }}>
</td>
</tr>
@endforeach
</tbody>
</table>
</div>
</body>
<script>
$(function() {
$('.toggle-class').change(function() {
var status = $(this).prop('checked') == true ? 1 : 0;
var user_id = $(this).data('id');
$.ajax({
type: "GET",
dataType: "json",
url: '/changeStatus',
data: {'status': status, 'user_id': user_id},
success: function(data){
console.log(data.success)
}
});
})
})
</script>
</html>

Now we are ready to run our example so run bellow command ro quick run:
php artisan serve
Now you can open bellow url on your browser:
http://localhost:8000/users
You can get download this example from here: Click Here.
I hope it can help you...

link : https://www.itsolutionstuff.com/post/laravel-update-user-status-using-toggle-button-exampleexample.html

Saturday, December 7, 2019

Laravel 5.7 - New Notification System Tutorial for Beginner

Laravel 5 added new feature as notification system with mail, database, sms, markdown, broadcast, slack etc. in this tutorial i will show you simple example demo of email notification system in laravel 5.7 application. you can also send all users notification at a time by using new notification system.
Laravel Notification can be by mail, database, sms or slack. we can easily create Notification by laravel artisan command. we can easily customization of notification like mail subject, mail body, main action etc. we almost require to use notification when we work on large amount of project like e-commerce. might be you need to send notification for payment receipt, order place receipt, invoice etc.
In this example we will create email notification and send it to particular user, than we saved to database. So, you need to follow few step to make basic example with notification.
Step 1: Download Laravel 5.7
I am going to explain step by step from scratch so, we need to get fresh Laravel 5.7 application using bellow command, So open your terminal OR command prompt and run bellow command:
composer create-project --prefer-dist laravel/laravel blog
Step 2: Create Database Table
In this step, we need to create "notifications" table by using laravel 5 artisan command, so let's run bellow command:
php artisan notifications:table
php artisan migrate
In this step, we need to create "Notification" by using laravel 5 artisan command, so let's run bellow command, we will create MyFirstNotification.
php artisan make:notification MyFirstNotification
now you can see new folder will create as "Notifications" in app folder. You need to make following changes as like bellow class.
app/Notifications/MyFirstNotification.php
<?php
namespace App\Notifications;
use Illuminate\Bus\Queueable;
use Illuminate\Notifications\Notification;
use Illuminate\Contracts\Queue\ShouldQueue;
use Illuminate\Notifications\Messages\MailMessage;
class MyFirstNotification extends Notification
{
use Queueable;
private $details;
/**
* Create a new notification instance.
*
* @return void
*/
public function __construct($details)
{
$this->details = $details;
}
/**
* Get the notification's delivery channels.
*
* @param mixed $notifiable
* @return array
*/
public function via($notifiable)
{
return ['mail','database'];
}
/**
* Get the mail representation of the notification.
*
* @param mixed $notifiable
* @return \Illuminate\Notifications\Messages\MailMessage
*/
public function toMail($notifiable)
{
return (new MailMessage)
->greeting($this->details['greeting'])
->line($this->details['body'])
->action($this->details['actionText'], $this->details['actionURL'])
->line($this->details['thanks']);
}
/**
* Get the array representation of the notification.
*
* @param mixed $notifiable
* @return array
*/
public function toDatabase($notifiable)
{
return [
'order_id' => $this->details['order_id']
];
}
}
Step 4: Create Route
In this is step we need to create routes for sending notification to one user. so open your "routes/web.php" file and add following route.
routes/web.php
Route::get('send', 'HomeController@sendNotification');
Step 4: Create Controller
Here,we require to create new controller HomeController that will manage generatePDF method of route. So let's put bellow code.
app/Http/Controllers/HomeController.php
<?php
namespace App\Http\Controllers;
use Illuminate\Http\Request;
use App\User;
use Notification;
use App\Notifications\MyFirstNotification;
class HomeController extends Controller
{
/**
* Create a new controller instance.
*
* @return void
*/
public function __construct()
{
$this->middleware('auth');
}
/**
* Show the application dashboard.
*
* @return \Illuminate\Contracts\Support\Renderable
*/
public function index()
{
return view('home');
}
public function sendNotification()
{
$user = User::first();
$details = [
'greeting' => 'Hi Artisan',
'body' => 'This is my first notification from ItSolutionStuff.com',
'thanks' => 'Thank you for using ItSolutionStuff.com tuto!',
'actionText' => 'View My Site',
'actionURL' => url('/'),
'order_id' => 101
];
Notification::send($user, new MyFirstNotification($details));
dd('done');
}
}
Now we are ready to send first notification to user. so let's run our example so run bellow command for quick run:
php artisan serve
you can run following url:
http://localhost:8000/send
you can also send notification like this way:
$user->notify(new MyFirstNotification($details));
you can get sent notifications by following command:
dd($user->notifications);
I hope it can help you....


Sunday, December 1, 2019

PHP isset() vs empty() vs is_null()

Value of variable ($var)isset($var)empty($var)is_null($var)
“” (an empty string)bool(true)bool(true)
” ” (space)bool(true)
FALSEbool(true)bool(true)
TRUEbool(true)
array() (an empty array)bool(true)bool(true)
NULLbool(true)bool(true)
“0” (0 as a string)bool(true)bool(true)
0 (0 as an integer)bool(true)bool(true)
0.0 (0 as a float)bool(true)bool(true)
var $var; (a variable declared, but without a value)bool(true)bool(true)
NULL byte (“\ 0”)bool(true)

Monday, November 25, 2019

How to deploy a React application to Firebase

After we built a full-fledged Firebase application in React, the final step is deployment, the tipping point of getting your ideas out into the world, from consuming tutorials to producing applications. Since you have already used Firebase extensively for your application, why not choosing Firebase Hosting for the deployment?
In this section, I want to guide you through deploying your React application to Firebase. It works for create-react-app too. Also it should work for any other library and framework such as Angular or Vue. First, install the Firebase CLI globally to your node modules:
npm install -g firebase-tools
Using a global installation of the Firebase CLI, you can deploy any application without worrying about the dependency in your project. For any global installed node package, remember to update it occasionally to a newer version with the identical command:
npm install -g firebase-tools
Next associate the Firebase CLI with a Firebase account (Google account):
firebase login
There should be a URL in your command line that opens in a browser. If this doesn't happen, Firebase CLI may open up the URL automatically. Choose your Google account you used earlier to create a Firebase project, and give Google the necessary permissions. You should see a confirmation for a successful setup. Return to the command line to verify a successful login.
Next, move to the project's folder and execute the following command, which initializes a Firebase project that can be used for the Firebase hosting features:
firebase init
Then, choose the Hosting option. If you are interested in using another tool to host your Firebase application, choose another option:
? Which Firebase CLI features do you want to setup for this folder? Press Space to select features, then Enter to confirm your choices.
◯ Database: Deploy Firebase Realtime Database Rules
◯ Firestore: Deploy rules and create indexes for Firestore
◯ Functions: Configure and deploy Cloud Functions
❯◯ Hosting: Configure and deploy Firebase Hosting sites
◯ Storage: Deploy Cloud Storage security rules
Since Google knows about Firebase projects associated with your account after logged in, you are able to select your Firebase project from a list of projects from the Firebase platform:
First, let's associate this project directory with a Firebase project.
You can create multiple project aliases by running firebase use --add,
but for now we'll just set up a default project.
? Select a default Firebase project for this directory:
-> react-firebase-authentic-d12f8 (react-firebase-authentication)
i Using project react-firebase-authentic-d12f8 (react-firebase-authentication)
There are a few other configuration steps to define. Instead of using the default public/ folder, we want to use the build/ folder for create-react-app. If you set up the bundling with a tool like Webpack, you can choose the appropriate name for the build folder:
? What do you want to use as your public directory? build
? Configure as a single-page app (rewrite all urls to /index.html)? Yes
? File public/index.html already exists. Overwrite? No
The create-react-app application creates a build/ folder after you perform the npm run build for the first time. There you will find all the merged content from the public/ folder and the src/ folder. Since it is a single page application, we want to redirect the user always to the index.html file. From there React Router takes over for the client-side routing.
Now your Firebase initialization is complete. This step created a few configuration files for Firebase Hosting in your project's folder. You can read more about them in Firebase's documentation for configuring redirects, a 404 page, or headers. Finally, deploy your React application with Firebase on the command line:
firebase deploy
After a successful deployment, you should see a similar output with your project's identifier:
Project Console: https://console.firebase.google.com/project/react-firebase-authentic-d12f8/overview
Hosting URL: https://react-firebase-authentic-d12f8.firebaseapp.com
Visit both pages to observe the results. The former link navigates to your Firebase project's dashboard. There, you should have a new panel for the Firebase Hosting. The latter link navigates to your deployed React application.
If you only see a blank page for your deployed React application, see if the public key/value pair in the firebase.json is set to build. That's the case if your build folder has the name build. If it has another name, set the value to this. Second, check if you have ran the build script of your React app with npm run build. After you have done both steps, try another deployment with firebase deploy. That should get your recent React build up and running for Firebase Hosting.